How to Upload a Word Docuement to an Existing Word Docuement
In Microsoft Part (similar in many other suites of apps), a watermark is a semitransparent text or epitome you can place in the background. Usually, you apply them to highlight something important near the certificate. For case, y'all can use it to remind the user that the content is confidential or draft. Yous may insert a watermark to make certain the user knows that the content should not be copied. Or other times, you may desire to add a washout mark to include the visitor's logo in the file.
Regardless of the reason, whether you have the version of Function from Microsoft 365, Function 2019, or an older version, the desktop version of Microsoft Word includes the ability to insert a watermark on whatever document. The feature allows you to insert predefined styles or create custom watermarks using text and images.
In this Windows 10 guide, nosotros will walk you lot through the steps to add or remove (and create custom) a watermark to a Microsoft Give-and-take document in Office.
- How to add unproblematic watermark to a Give-and-take document
- How to add custom watermark to a Word document
- How to edit watermark on a Word certificate
- How to create and salve custom watermark in Word
- How to remove watermark to a Word document
How to add simple watermark to a Word certificate
To add a watermark to a Word certificate using a predefined template, use these steps:
- Open up Word.
- Click the Blank document pick in the Home section. (Or open the document yous want to customize.)
- Click the Design tab.
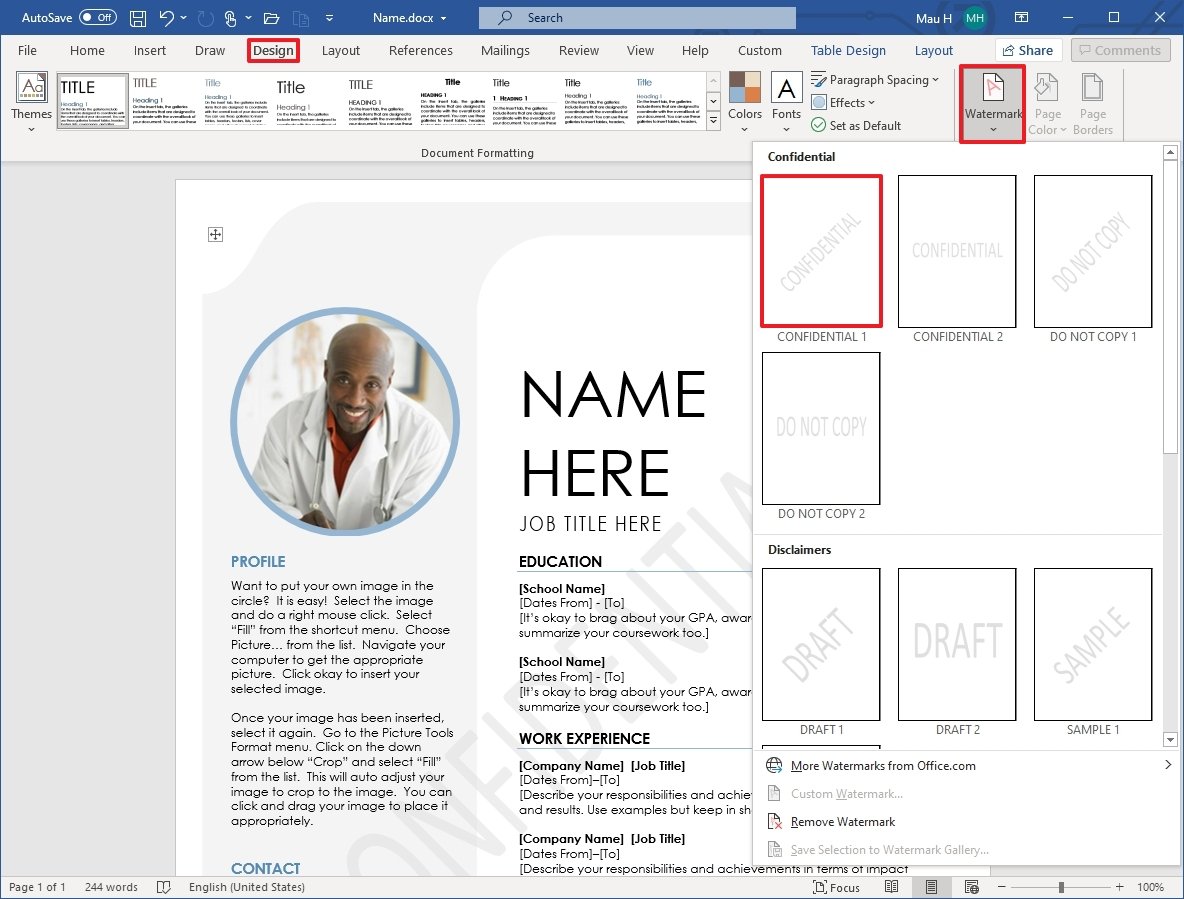
- In the "Page Groundwork" department, click the Watermark option.
-
Select one of the Confidential watermark choices:
- Confidential.
- Do not copy.
 Source: Windows Key
 -
Select ane of the Disclaimers watermark choices:
- Draft.
- Sample.
- Click the File menu.
- Select the Save push button.

Once y'all complete the steps, the watermark will be applied to the certificate.
How to add custom watermark to a Word certificate
In Microsoft Office, yous tin also insert custom watermarks using images and text.
Using paradigm
To fix a custom prototype as a watermark in Word, utilise these steps:
- Open up Word.
- Click the Blank document option in the Dwelling house section. (Or open the document you want to customize.)
- Click the Pattern tab.
- In the "Page Background" department, click the Watermark option.
-
Click the Custom Watermark selection.
 Source: Windows Key
 - Select the Motion picture watermark option.
-
Click the Select Motion picture button.
 Source: Windows Central
 -
Select the source to import the watermark moving-picture show, including:
- From a file.
- Bing Prototype Search.
- OneDrive.
 Source: Windows Central
 Quick note: If you desire to employ an prototype from Bing, use the text box to search for a moving picture.
- (Optional) Select the calibration option for the image.
-
Check the Washout option if yous want the prototype to exist semitransparent.
 Source: Windows Fundamental
 - Click the Apply push to preview the watermark.
- Click the OK push button.
- Click the Close push.
- Click the File menu.
- Select the Relieve button.


After you complete the steps, the custom image you selected will appear as the document's watermark.
Using text
To prepare custom text as a watermark in Word, apply these steps:
- Open up Word.
- Click the Blank document option in the Home section. (Or open the document you want to customize.)
- Click the Pattern tab.
- In the "Page Background" section, click the Watermark choice.
-
Click the Custom Watermark selection.
Source: Windows Central - Select the Text watermark option.
-
In the Text box, type the text as you want it to appear in the certificate.
 Source: Windows Key
 - Use the Font driblet-down menu to select the font way for the watermark.
-
Use the Size drop-down carte to specify the size for the font.
Quick tip: Usually, the default size is enough for most cases.
- Use the Color drib-down bill of fare to modify the color of the watermark.
- Check the Semitransparent pick.
-
Select the layout of the watermark:
- Diagonal.
- Horizontal.
- Click the Apply button to preview the watermark.
- Click the OK button.
- Click the Close button.
- Click the File card.
- Select the Salvage button.

Once you lot complete the steps, the text y'all entered will be displayed every bit the watermark for the Microsoft Word document.
While the ability to add watermarks is available in previous versions of Microsoft Office, you lot should consider switching to Microsoft 365. The subscription-based service provides a costless upgrade of the almost popular office app. You also get many other benefits, such as sharing the apps with other family members and friends, and services like Microsoft Teams, Family Condom, Microsoft Editor, and 1TB of OneDrive storage.
Go subscribed
![]()
Microsoft 365
Microsoft 365 (formerly Role 365) gives you lot full access to all the apps and perks. You can likewise install Discussion, Excel, PowerPoint, Outlook, and other apps on up to five devices, and depending on the subscription, you tin can share the account with upward to six people.
How to edit watermark on a Give-and-take document
After calculation a watermark to the certificate, you can also adjust the await and feel of the element. Here's how:
- Open up Give-and-take.
- Open up the document with the watermark.
- Double-click the header of the certificate.
- Select the watermark element.
-
In the Pic Format tab, you volition find all the available tools to conform the element, including brightness, dissimilarity, shadow event, and more.
Quick note: If you are adjusting the text mode, y'all volition see the WordArt tab with relevant options, such equally to edit the text, change the spacing, 3D effects, alignment, and more.
- (Optional) Use the dots to resize the shape.
-
(Optional) Use the light-green dot to rotate the shape.
 Source: Windows Central
 - (Optional) Click and drag the element to movement effectually.
- Click the File menu.
- Select the Save button.

After you complete the steps, the changes will be reflected in the document.
How to create and save custom watermark in Word
Yous can also create custom watermarks that yous tin can save and use in other documents.
To create and relieve a custom watermark in Give-and-take, use these steps:
- Open Word.
- Click the Bare certificate pick in the Habitation section.
- Click the Design tab.
- In the "Folio Background" section, click the Watermark option.
-
Click the Custom Watermark option.
Source: Windows Fundamental -
Select the Picture watermark or Text watermark option.
Source: Windows Key - If you selected the Motion-picture show watermark option, click the Select Moving-picture show button to cull an image. (See to a higher place instructions.)
- If you selected the Text watermark pick, utilise the available settings to create a text-based watermark. (Run into above instructions.)
- Click the OK push. ten Double-click the header of the document.
- Select the watermark chemical element.
- Utilize the available options in the Motion-picture show Format or WordArt tab, depending on the watermark type you are using.
- (Optional) Use the dots to resize the shape.
-
(Optional) Use the light-green dot to rotate the shape.
Source: Windows Central - (Optional) Click and drag the element to move around.
- Click the Design tab.
- In the "Page Background" department, click the Watermark pick.
-
Click the Save Selection to Watermark Gallery choice.
 Source: Windows Fundamental
 -
Ostend a name for the watermark.
 Source: Windows Central
 - (Optional) Confirm a description for the element.
- Click the OK push button.


In one case you lot complete the steps, the watermark will save, and you lot will exist able to reuse it in future documents.
How to remove watermark to a Discussion document
To remove a watermark from a Word document, use these steps:
- Open up Word.
- Click the Blank certificate option in the Abode department. Or open the document yous want to customize.
- Click the Pattern tab.
- In the "Folio Groundwork" section, click the Watermark choice.
-
Click the Remove Watermark pick.
 Source: Windows Central
 - Click the File menu.
- Select the Salve button.

After you lot consummate the steps, the image or text will no longer appear every bit the watermark.
More Windows x resources
For more helpful manufactures, coverage, and answers to common questions about Windows ten, visit the post-obit resource:
- Windows x on Windows Central — All you need to know
- Windows x help, tips, and tricks
- Windows ten forums on Windows Primal
Nosotros may earn a committee for purchases using our links. Learn more.

Rolling out of the Garage
On this week'due south podcast ... We recap the Windows 11 result, and more!
We're back with another exciting episode of the Windows Central Podcast, and this week, nosotros written report on Microsoft's hybrid work result, new builds of Windows xi, and the possibility of putting Android on Surface Neo. At that place'south also a new proper name and look for Microsoft'south Journal app, an interesting mini PC coming from Apcsilmic, and more.

More than reasonable
Microsoft's Surface Duo 2 is at present just $999 — its lowest toll e'er
We take some good news if you're on the fence about Microsoft's Surface Duo ii due to the high toll. Both Microsoft and Best Buy are now offering the dual-screen Android telephone for $999 — a savings of $500 off the original cost. Toss in a trade-in, and y'all can take it even cheaper.
townsendslesintsend.blogspot.com
Source: https://www.windowscentral.com/how-add-watermark-word-document-office
0 Response to "How to Upload a Word Docuement to an Existing Word Docuement"
Post a Comment